Steps for Preparing Subfloors When Doing Floor Installations
- Written by NewsServices.com

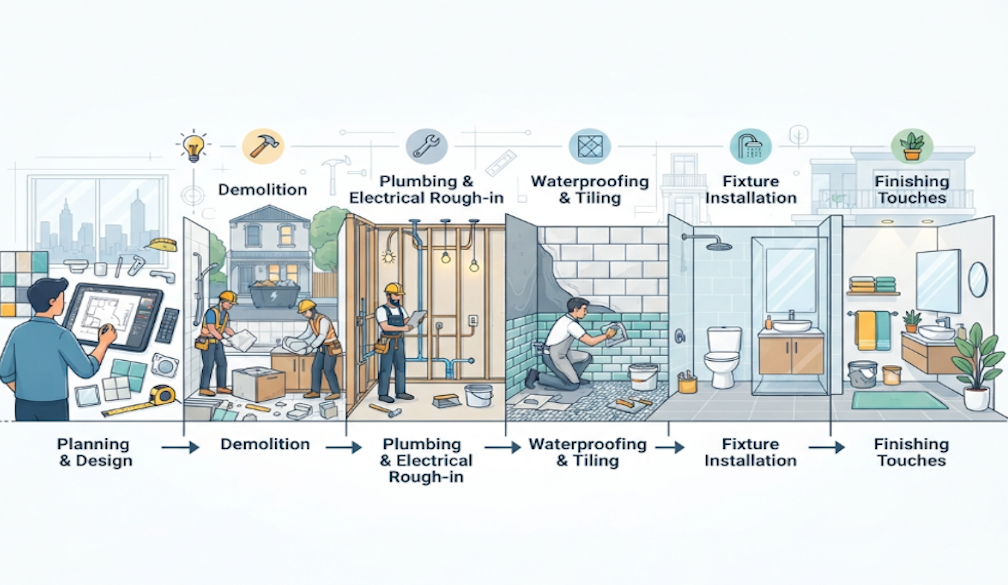
Preparing the Subfloor
Whether you are remodeling or building a home, preparing the subfloor is an important step. The subfloor is the layer of material that provides the foundation for your flooring. Depending on what type of flooring you plan to install, there are specific steps to take in order to ensure your flooring will last and look great for years to come. The first step in preparing the subfloor is cleaning it thoroughly. Use a broom or vacuum cleaner to remove dirt and debris from the surface before moving onto more detailed cleaning methods. After sweeping away any loose dust and dirt, use a damp mop or cloth rag with warm water and mild detergent solution to clean any remaining residue from the surface. Allow it time to dry completely before moving on.
Once your subfloor is cleaned, inspect it for any signs of damage such as warping, cracking, sagging or other irregularities that could cause issues later on with your flooring installation. If you find any damage then you may need to repair these areas first before laying down new flooring materials such as plywood underlayment or self-leveler compound which can help even out uneven surfaces so that they are ready for hybrid flooring installation.
Measuring and Cutting the Flooring
Measuring and cutting the flooring for a new space can be a daunting task, but with the right tools, it’s easy to get the job done quickly and accurately. Whether you’re installing laminate or hardwood flooring, having the proper measuring tools and cutting techniques is essential for achieving a professional-looking result.
Before beginning any project, measure your space twice to ensure accuracy. If you’re laying down multiple pieces of flooring in one room, use an L-shaped ruler or tape measure to determine exact dimensions before making any cuts. It’s also important to make sure that your starting point is square so that each piece of flooring will fit together perfectly in its final position.
Once measurements are taken, lay out all of your pieces on the ground and mark off where they need to be cut with a pencil or chalk line. You can then use either a circular saw or jigsaw depending on what type of material you’re using for your flooring. To avoid splintering and chipping along the edges of each piece, make sure all blades are sharpened before beginning any cuts.
Installing the Transition Strips
Transition strips are a great way to add the perfect finishing touch to any room. They provide the perfect transition between flooring of different heights and materials, and can really help tie together the look of a room. Installing transition strips doesn’t have to be difficult; with these tips, you’ll have your transition strip in place in no time.
The first step is to measure the area where your transition strip will go and determine which type of strip you need. Transition strips come in a variety of sizes, shapes, and thicknesses for different types of flooring. You can also choose from a wide array of colors and finishes, so make sure you pick one that matches your décor perfectly.
Once you have selected your strip, it’s time to begin installation. Start by cleaning the area thoroughly before placing down your transition strip – this ensures that any dirt or debris won’t interfere with its fitment or appearance later on. Then use an adhesive like Liquid Nails or construction adhesive to attach it firmly into place on both sides along its length. Make sure that it is level with both surfaces so there are no gaps in between them when finished.
Laying the Hybrid Flooring Planks
Laying hybrid flooring planks is a great way to update your home and give it a fresh look. Hybrid flooring is a combination of vinyl and laminate, providing the durability of laminate with the look of hardwood or tile. It’s also waterproof, making it ideal for busy households or areas prone to moisture such as bathrooms or kitchens.
When laying hybrid flooring planks, there are a few things you should know to ensure success. The first step is to measure the area where you want to lay the planks and determine how many boxes you need for your project. Once you have this information, make sure that all boxes contain boards from the same manufacturer and color range in order to achieve an even finish across all planks.
Next comes preparation – make sure that any existing floors are clean, dry and level before beginning installation so that everything fits together properly when laid down. You may need additional materials such as adhesive strips depending on what type of surface you’re laying on top of (concrete vs wood). If necessary, use spacers between each plank in order to maintain uniform spacing throughout your project.
Once everything is ready for installation it’s time to start laying down your hybrid flooring.
Sealing and Finishing
When it comes to protecting your floors, sealing and finishing is essential for keeping them looking their best. Sealing and finishing help protect hardwood and tile flooring from the wear and tear of everyday life. Whether you’re installing a new floor or simply refinishing an old one, it’s important to understand the difference between sealing and finishing so you can properly care for your floors.
Sealing is the first step in protecting any kind of flooring material. It helps lock out dirt, dust, water, oil, grease, mold, mildew and other contaminants that can damage the surface over time. There are several types of sealers available depending on your particular needs such as water-based sealers or oil-modified sealers for hardwood floors; penetrating concrete sealers for concrete surfaces; waxes for vinyl tiles; grout sealants for ceramic tiles; etc. When selecting a sealer make sure that it is specifically designed to work with the type of material you are working with as some products may not be compatible which could cause damage to your flooring over time.
Once sealed properly then comes Finishing which adds shine to the surface while also providing additional protection against scratches caused by foot traffic or furniture sliding across its surface.