Guide and Instructions For Installing Cabinet Door Hinges
- Written by News Company

A kitchen renovation can be an exciting or daunting process, depending on the degree of your expertise and confidence. One way you can give your kitchen a new, improved look without spending a fortune is by installing new cabinetry hardware, like cabinet hinges. It may take some time and patience to install new cabinet door hinges, but it’s a pretty simple and cost-effective way to improve the overall aesthetics and functionality of your kitchen.
Fitting Kitchen Cabinet Hinges
In this article, we will cover general measurements of hinges and how to fit them for your cabinets. These measurements are from a sample item and if you've purchased cabinet door hinges, we recommend you look at the actual hinge product information page for detailed sketches that can provide you with precise measurements.
You'll have to look at the cabinet as you find out which hinges you like, and where you want the door edge to break. If you have an adjacent door that has to share the edge of the cabinet with the door you are installing, the half overlay hinges are required. If the door alone covers the entire side of the cabinet then a complete overlay hinge is required.
When you have chosen which type of hinge you need, you can determine which features you want in that hinge. You can go for the cheapest option, or upgrade to a soft close hinge.
Number of Hinges
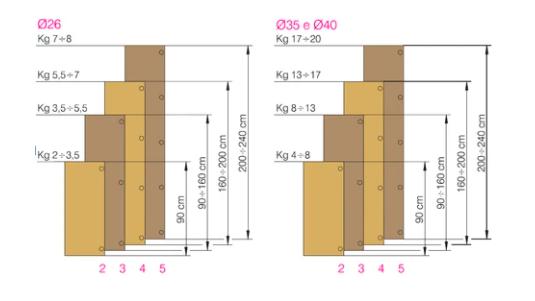
First and foremost, you should determine how many hinges you’ll be needing. Several bigger doors need up to five hinges to properly open. A comprehensive illustration below tells you the right number of hinges depending on the weight and size of the door of your cabinet.
Drilling the Hole of the Hinge on the Door
Then you should check the hole diameter of the door where your hinge currently sits in, which is usually 26 mm, 35 mm or 40 mm. If you are installing new cabinet door hinges, you will need hole cutters which are available in varieties of 26 mm and 40 mm. If you are installing a new door hinge, you should use hole cutter attachments to drill the right-sized hole on the door. You will have to measure 21.5 mm inwards from the door edge - this leaves the hole 4 mm from the door edge - then the hole will have to be 12 mm deep for the hinge cup to sit flush. When placing the hinge inside the cup hole, insert the screws to fully attach it.
If you've recently painted your cabinet doors, be sure that you have touch up paint handy in case refitting them creates flaws in your paint work. See more here.
Mounting Plate Fitting
The location of the mounting plate hole should be 37 mm from the front edge of the side of the cabinet for complete & half overlay hinge applications; whereas the vertical centres in between the two plate holes need to be 32 mm apart.
For application of inset hinges, the position of the mounting plate hole should be 37 mm + door thickness + 1 mm for the door to be flush with the cabinet side’s front edge. The vertical centres in between the two plate holes need to be 32mm apart.
When you use pre-assembled euro screws, you will require a 10mm-deep, 5mm-diameter hole and a 1.5 mm (1/16”) pilot hole or a bradawl to mark the position with wooden screws.
Attaching Hinges to the Mounting Plate
In the case of Clip-On hinges, you just need to line up the hinge with the mounting plate and push it on. When already connected, it should ‘clip.’ You'll have to do this for all the hinges of the cabinet door, while considering the positioning of the other hinges farther down the frame; often it's a smart idea to have them all lined up in one go before placing the first one on.
You'll need to put the hinge on the top of the mounting plate in the case of Slide-On hinges, and then make sure it’s been secured with the screw at the top. Make sure you repeat this process for all the hinges, and have them all lined up in one go before placing the first one on.

Horizontal, Vertical, and Lateral Adjustment
If the door does not line up perfectly with the carcass or other doors, the hinge has a vertical adjustment that lets you move the door up and down by + /-2 mm so that you can line it up at the top.
Your hinge will also have a lateral adjustment that helps you to tilt the door slightly by + /- 2 mm to line it with the other doors on the cabinet. You can see a screw to do this on the hinge.
To make horizontal adjustments on a Tutti-concealed hinge, the hinge is adjustable so that the door can be moved in and out. This ensures the door will be lined up with the other cupboard or cabinet doors.


